Image © Boat Building Academy
One of the most iconic yet familiar embodiments of the triumph of mankind over nature is the boat, an invention borne out of necessity, dating back to prehistoric times. The expertise and craftsmanship involved in building a vessel out of wood, one of the most beautiful and versatile of natural materials, which is watertight and at the same time stunning, is entrancing. The reverence of such an achievement is, no doubt, enhanced by the historical significance of the ability to command the waters around our modest island.
The age-old craft of boat-building has, of course, become less relevant in these modern times, yet no less revered; the sight of a traditional wooden vessel conquering the crests of the waves, whether a simple rowing boat or majestic galleon, evokes a passion and wonder in everyone.
We are extremely lucky to be given an insight into how the traditional craft of wooden boatbuilding is still being practised and perfected today, as Yvonne Green, Principal of the Boat Building Academy, in the following excerpt from a wider interview, outlines how a simple clinker boat and set of oars is handcrafted by a team of expert boat-builders from the Boat Building Academy, Lyme Regis in Dorset.
About the Boat Building Academy
The BBA, founded in 1997, is renowned as a “Centre of Excellence” for teaching boat building skills to those starting out in their career, or those mid-career looking to change direction for a new way of life. The BBA teaches both modern and traditional boat-building skills, with an exceptional reputation for traditional wooden boat construction and restoration. The Academy is situated on Monmouth Beach in Lyme Regis, known as the “Pearl of Dorset‟, at the heart of the Jurassic Coast.
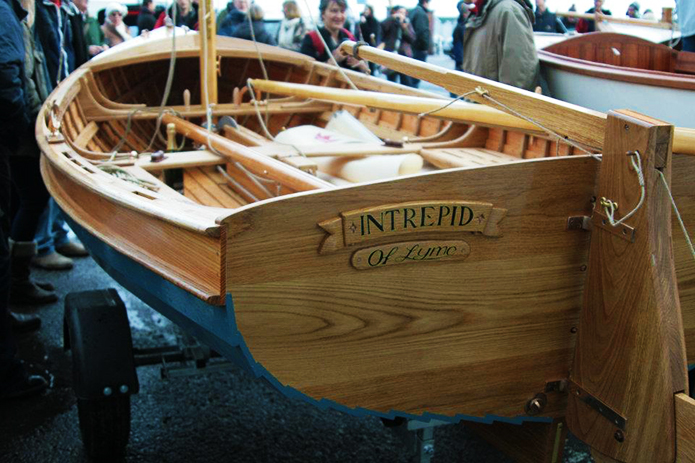
Image © Boat Building Academy
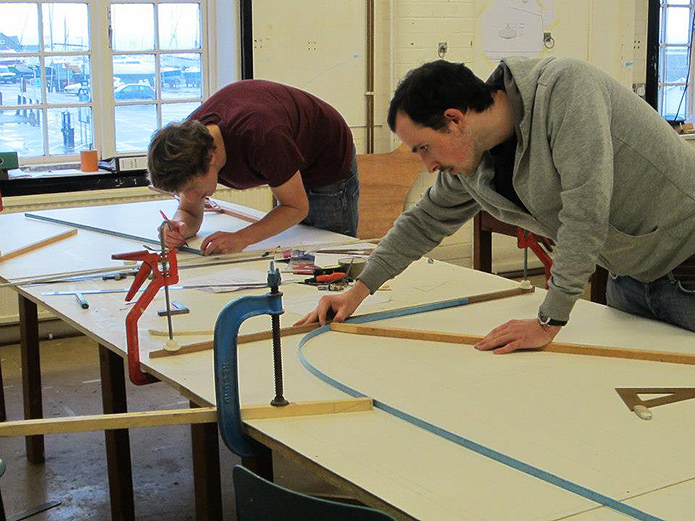
Once we have decided which boats will be built the plans are obtained, whether this is from a designer, from lines taken from an existing boat or from a design which we have produced here at the Academy.
During ‘lofting’ we then produce a full sized drawing of the boat, before making templates and moulds around and with which the boats will be built. Choices are made on timber type and a cutting list produced for our Machinist.
Image © Boat Building Academy
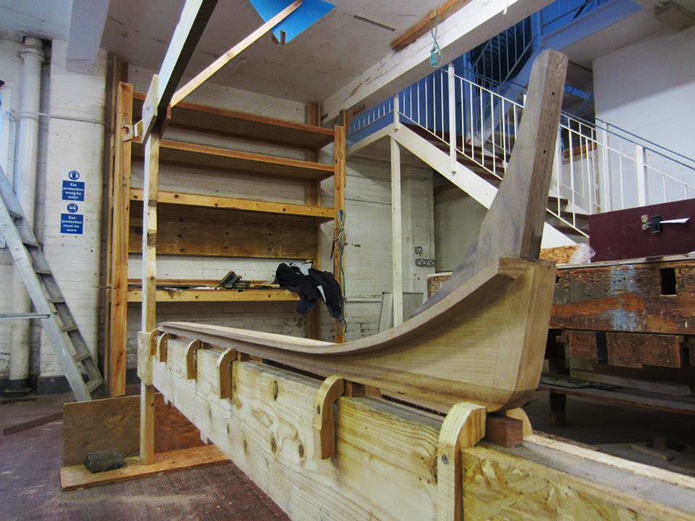
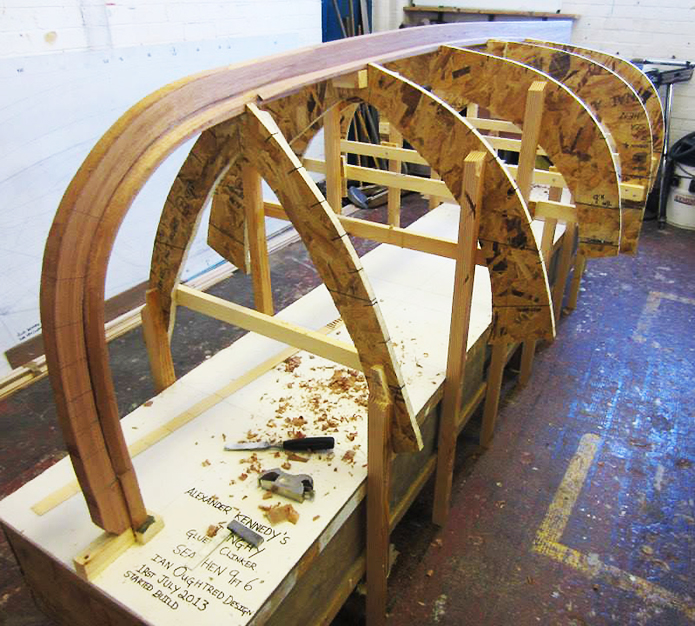
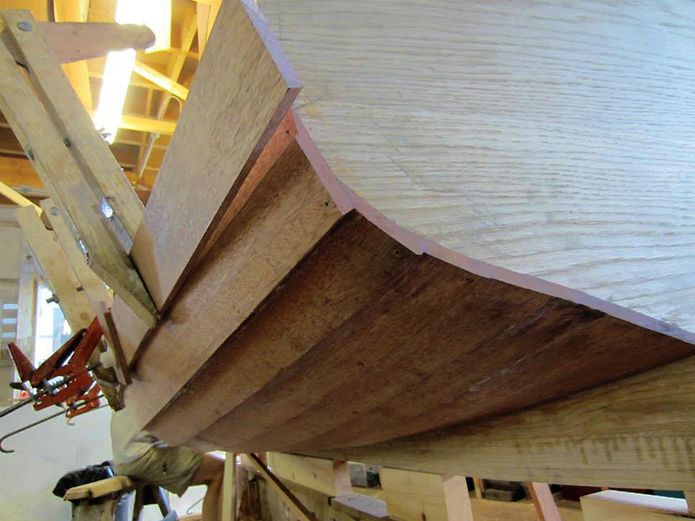
The next stage, if building a traditional clinker (overlapping planks secured with copper nails) boat is to set up the building frame, starting with a keel bearer, usually a long beam set up just above floor level and underneath an overhead beam. Onto this the keel, stem and transom parts of the boat will be built and form the central backbone structure. The stem may be fashioned from sections of solid timber or laminated from glued veneers. It might already be possible to shape parts of what is known as the “rabbet”; the angled groove in the backbone structure into which the edge of the first plank or “garboard” sits and also into which the ends of the planks sit in the bow.
Image © Boat Building Academy
The building moulds, produced earlier from the lofting, would then be set up in their positions along the backbone. These moulds are temporary and are used to form the planking shape as the boat is being built only. The moulds must be accurately set up, plumb and square usually in relation to the boats designed waterline which acts as a reference during the build.
Image © Boat Building Academy
Image © Boat Building Academy
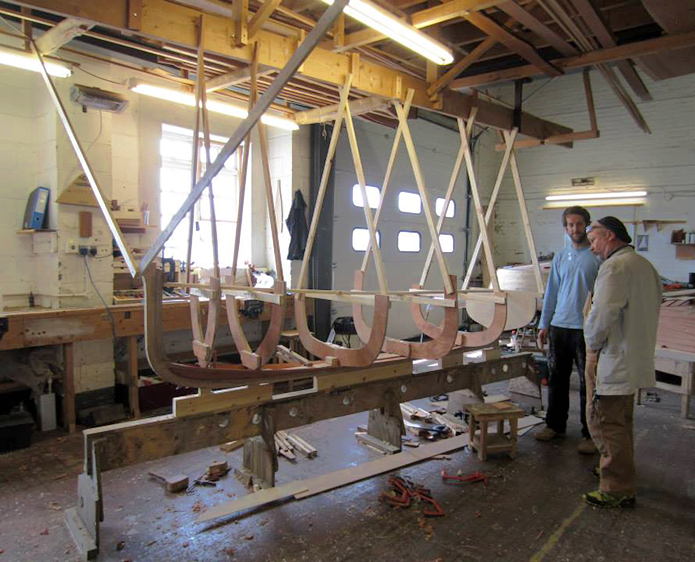
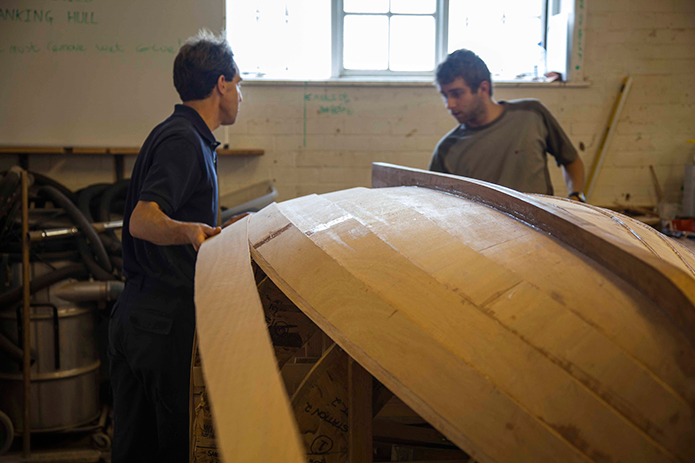
The next step is to “line-off” for planking, that is to determine where the plank edges will be, based on the determined number of planks for the boat. Based on the number of planks per side, marks are made on the moulds are pre-determined positions. Battens are then nailed below these marks, fore and aft of the moulds. The builder must then determine whether the lines prescribed by the battens are “fair”, that is smooth in form. It may be that battens need to be unfastened in refastened to give a pleasing look or to simplify planking. In certain areas of the hull, determined by the shape and curvature at various points, the boat may be easier planked by using narrower or wider planks. Once suitable lines are determined, the planking can begin.
The first plank, the “garboard” usually takes more time than the following planks to fit. It is important that the garboard fits the rabbet accurately, to keep out water, but also any errors or unfairness in its shape may dramatically affect the overall look of finished hull. Once the garboard is fitted, possibly with some bedding compound, a traditional oil based mastic possibly and fixed with copper rivets, the remainder of the planks can be fit.
Image © Boat Building Academy
Depending on the type of timber used and the length of the hull and planking stock, each plank may need to be lengthened using a traditional joint called a “scarf” or “scarph”. Each plank must be carefully fitted to the previous as usually no bedding or sealant is used between the planks. Initially the previous plank will be “browed-off”, that is a bevel will be made along its length that will allow the following plank to sit tightly onto it.
Image © Boat Building Academy
At either end, a special bevel called a “gerald” is used, although this name varies by region and country. This bevel serves to remove the plank overlap and brings the edges of the plank ends flush into the centreline.
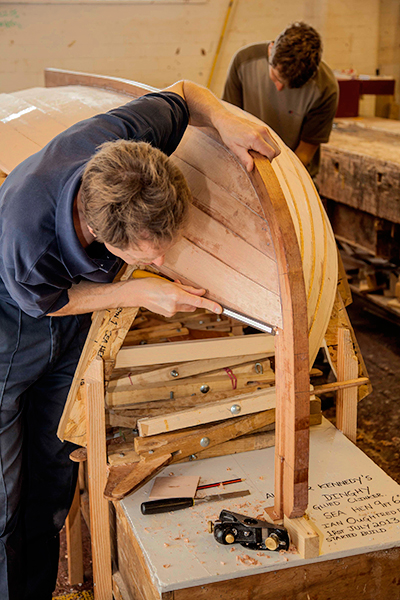
As the each plank is fitted it is riveted to its predecessor. The final plank is referred to as the “sheer” plank, the sheer being the line which is formed by the top edge of the planking. The final shape of the sheer is then worked, usually with the aid of a batten and by eye to determine the most favourable shape and curve. The sheer plank is often wider than the norm to allow for the subsequent fitting of a rubbing strip which would otherwise make the sheer plank look oddly narrow.
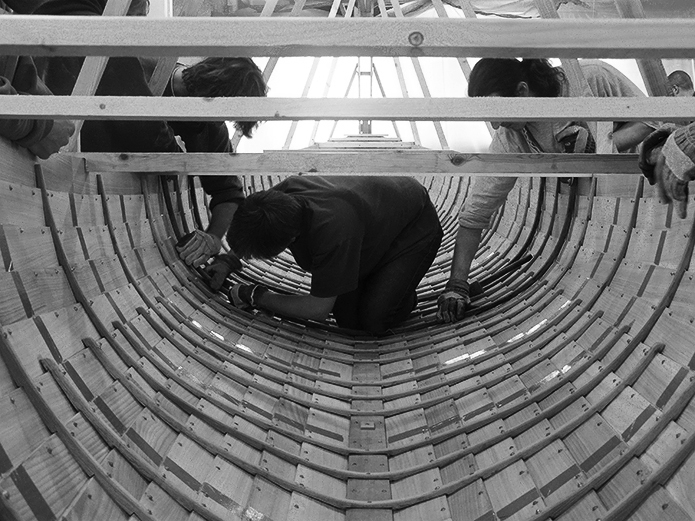
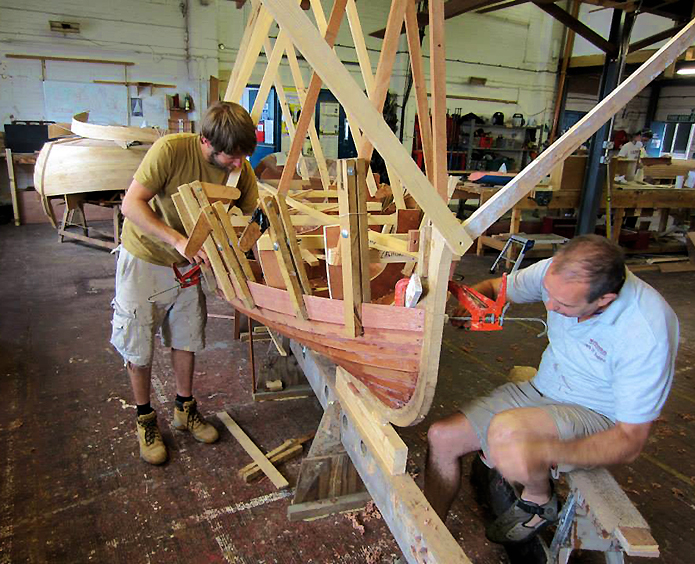
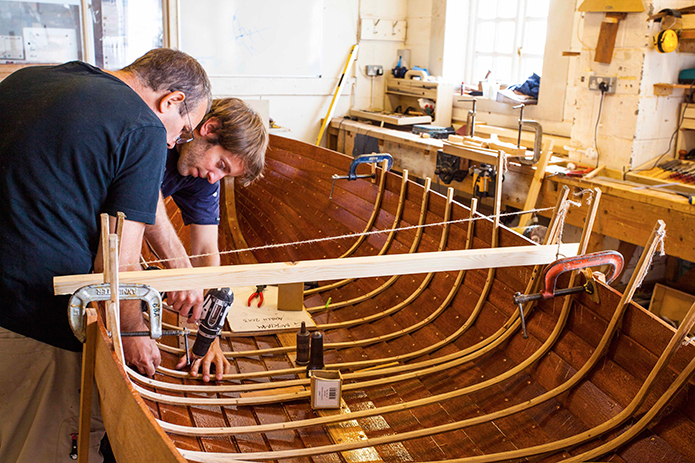
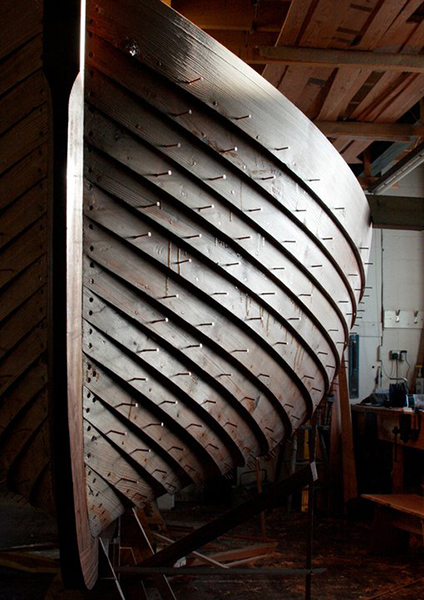
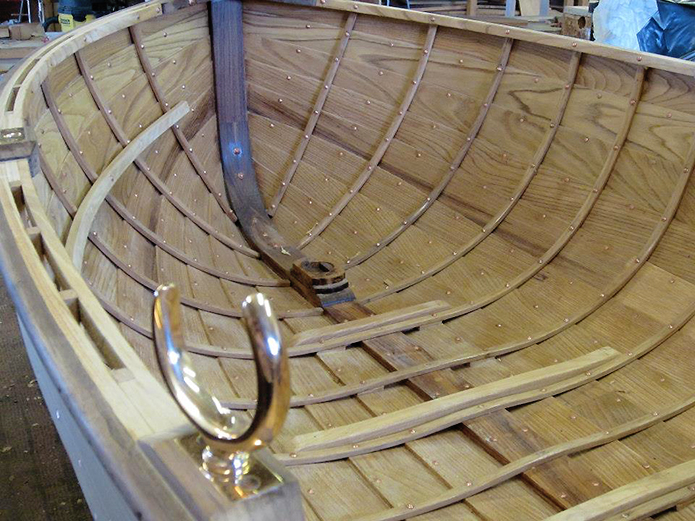
The hull planking is now complete, but requires additional stiffening. Usually we would now steam in “ribs” which are narrow strips that serve to reinforce the planking, which is currently only edge fastened. Holes would be pre-drilled in the planking at intervals along the length of the hull, although at the same point on each plank, across the width of the hull. The ribs are fitted around the hull from sheer to sheer at 90 degrees to the centreline.
Image © Boat Building Academy
Normally these ribs are from fresh sawn oak, but other types of oak or timber can be successfully used. The ribs are placed in a long box or pipe, usually with one or two wall paper steamers attached to either end. The box or tube is loosely sealed as we do not want to build up any pressure. The steam serves only to heat the timber, not to add moisture. Once the timbers are hot enough they become pliable and are easily bent into the hull.
If building in a very traditional manner, nails will have been placed into the holes drilled in the planks earlier and the nails will be driven through the timbers as they are tightly bent into the hull. The nails would then be turned into rivets with the addition of small conical washers called “roves”. The excess nail is trimmed off and the remaining end is “peened” over the rove.
Image © Boat Building Academy
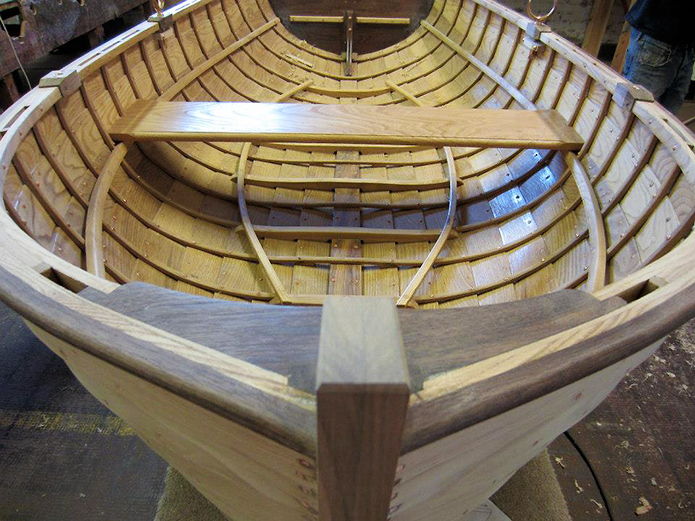
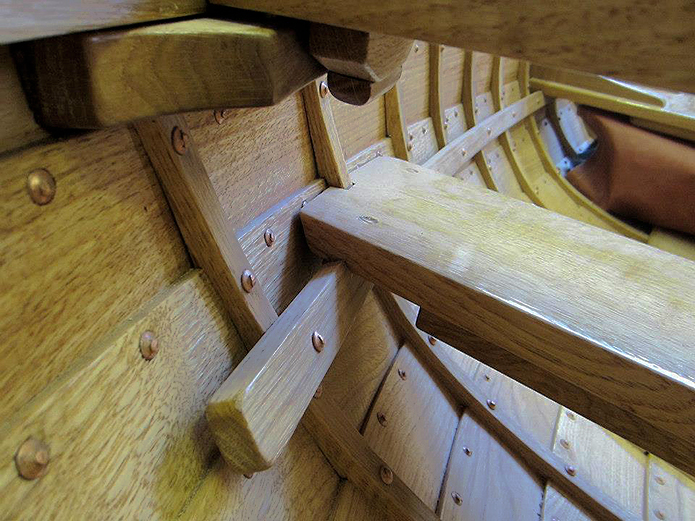
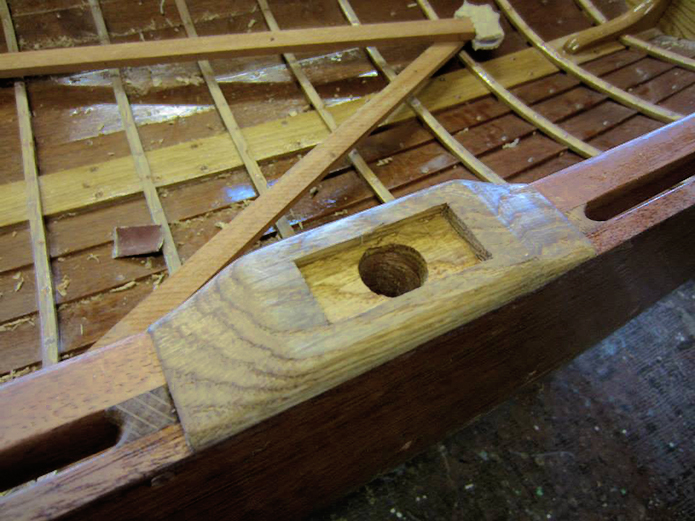
The final structural elements are then be added, such as knees and a “breast hook”, in the stern quarters and bow.
Image © Boat Building Academy
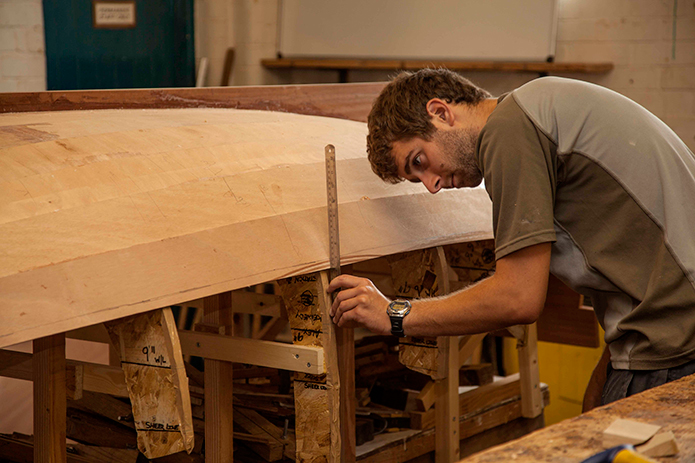
Longitudinal members like the gunwales and rubbing strips are then added, these are usually inside the planking at the sheer level, over the ribs and outside the planking at the sheer or along the bottom part of the sheer plank. These serve to help stiffen the planking at the sheer. Next additional longitudinal battens called stringers are added where required; this will include a “riser” onto which the “thwarts” or seats will sit. The thwarts themselves serve to hold the two sides of the boat together and at the same time, apart. They are also fitted with knees to help braces them in position and for additional strengthening of the hull.
Image © Boat Building Academy
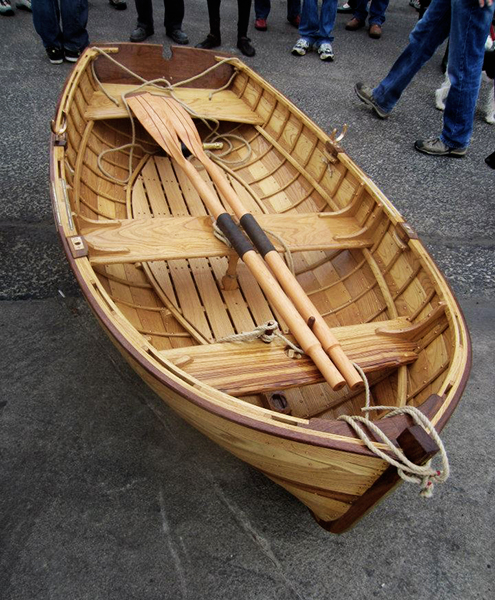
One might choose to fit “sole boards” which are boards which are used in the bottom or “bilge” of the boat so that one does not stand directly onto the planking when using the boat. Onto these “stretchers” may also be fitted for bracing ones feet whilst pulling, sculling or rowing, depending on the vessel type. At this point the fittings may be added, be that “pins”, “oarlocks”, “rowlocks” or just eye-bolts for attaching “painters”.
Image © Boat Building Academy
Image © Boat Building Academy
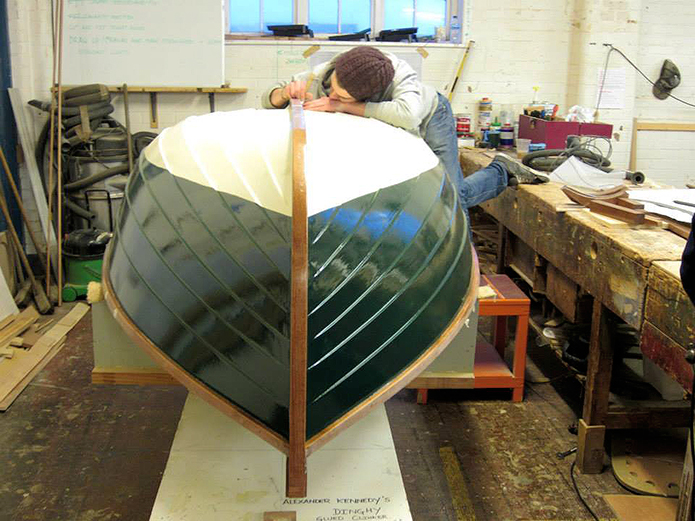
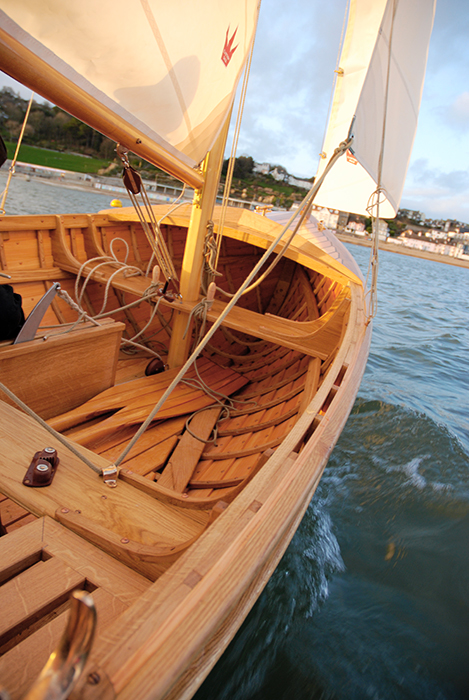
Lastly, one would finish the vessel, either with a traditional paint, varnish or oil. A number of coats would be applied to achieve the required build and level of finish that would protect the vessel and its structure from wear and tear and environmental factors, such as moisture and UV damage.
Image © Boat Building Academy
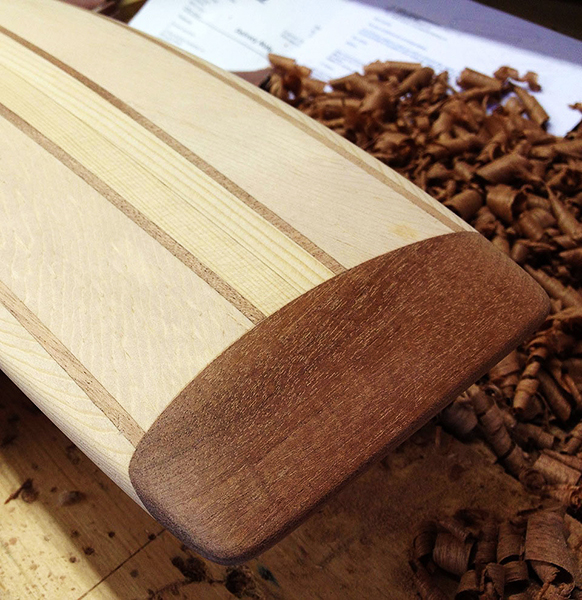
To make an oar, one must first determine the length required. This is usually determined by the vessel width or “beam” and position from which the oar would be used. Shape of “blade” must also be decided and to some degree this is down to personal choice, although one could opt for a traditional oar for the hull type.
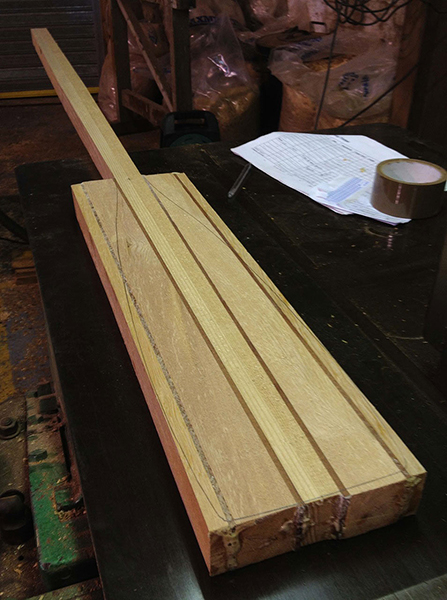
Once satisfied, a blank is made up, this usually constructed or laminated, from a number of pieces of timber. Think of it as one long piece, which forms the “loom”, the shaft of the oar and runs from the handle part through almost to the tip of the blade. This may be of good quality fir or spruce of say 2” square and should have straight grain and as few knots or blemishes as possible. To form the blade end, we take two shorter pieces of timber of the same dimension, 2” square again and glue these onto the blade end of the loom, which in this simple form, could be either end.
Image © Dominik Gschwind
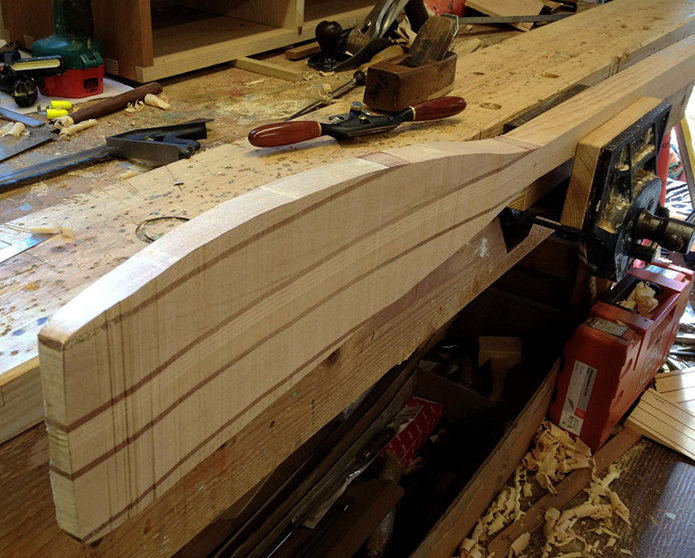
The “cheeks” as these blocks are called should be glued on opposite sides of the end of the loom with their ends aligned with its end. The next stage would be to shape the blade. This is done by taking some pre-made templates. We have a number of templates for a variety of oar shapes. The templates shapes are transferred to the stock, usually onto the sides of the cheeks first, after which they are cut to shape on a band saw. The patterns for the face of the blade is then transferred to the blank and again cut on the band saw.
Image © Dominik Gschwind
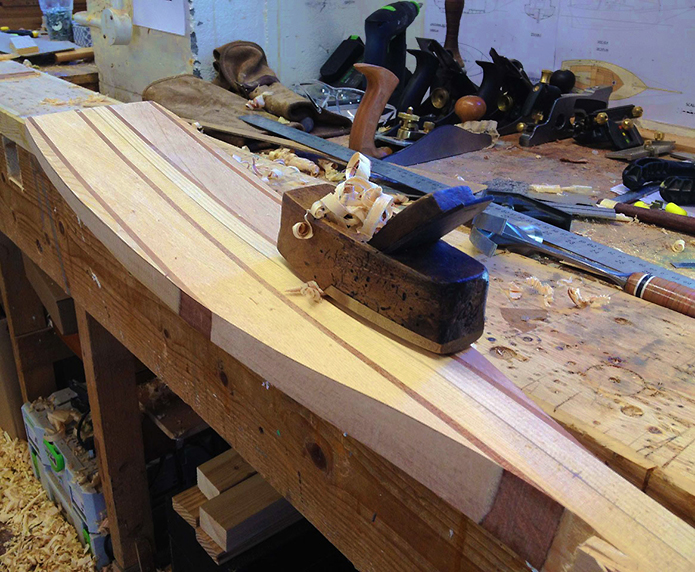
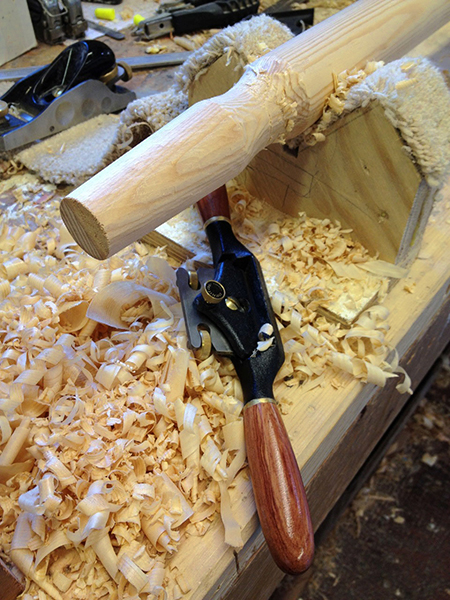
Now one must complete the shape of the blade usually from experience or using another oar as a guide with tools such as a draw knife, spokeshave and “bollow plane”.
Image © Dominik Gschwind
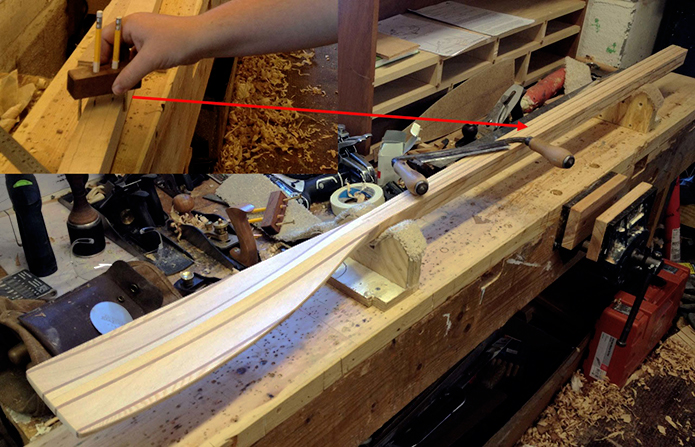
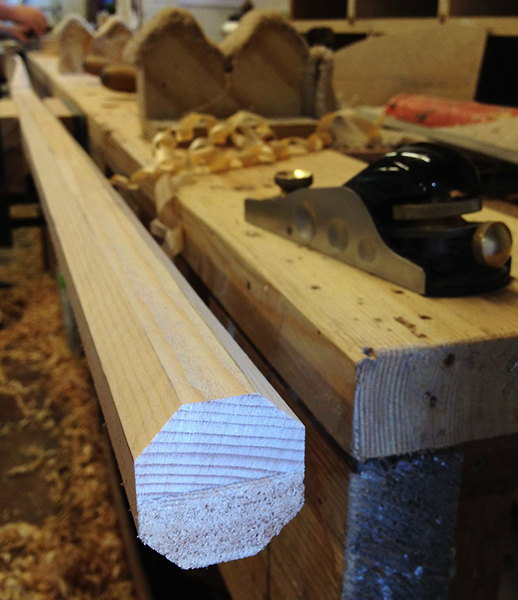
Bollow planes are planes that have soles which curve in two planes and allow the plane to scoop out hollows. Once one is happy with the blade shape and look, it is the turn of the loom. This may be tapered or straight, but the principal for rounding it off is the same. Using a spar gauge, one first marks the faces for removal of the corners, to leave an octagonal shape.
Image © Dominik Gschwind
The material is removed with a draw knife, plane or spokeshave.
Image © Dominik Gschwind
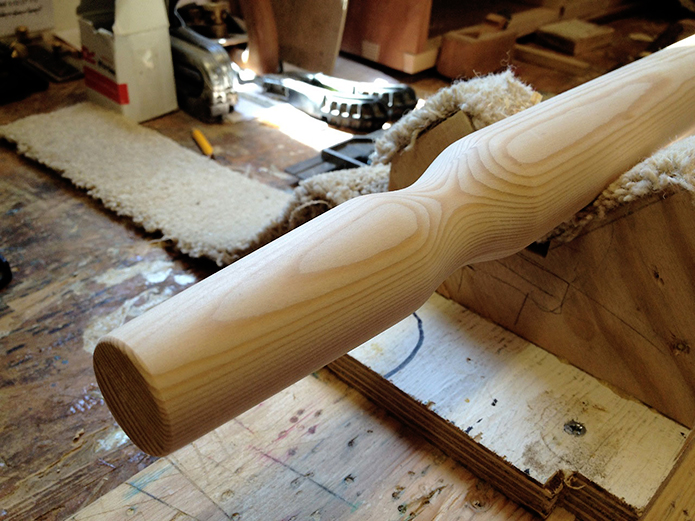
Once this is completed and it must be accurately done for the finished items to be truly round, the faces are remarked, this time with the aim of turning the eight sides into sixteen. Again once marked, the water is removed. At this point, it is generally possible to skim off the corners by eye to take the loom to thirty two sides.
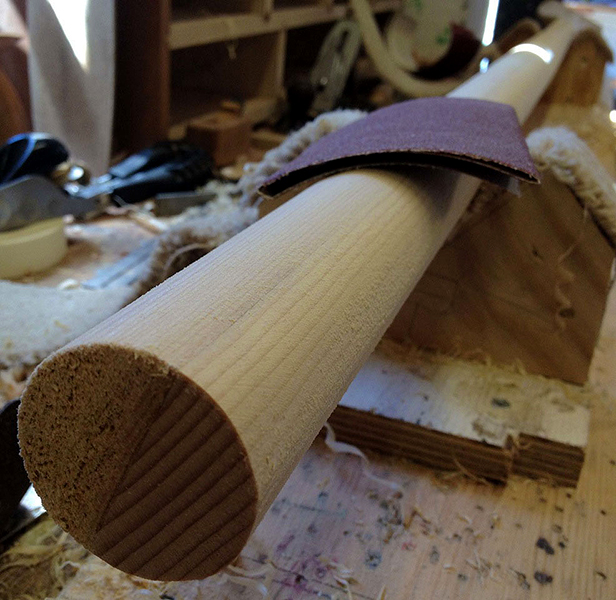
Now one needs to have some patience and careful plane the loom both along its length and around its circumference, although generally working in quarters, with an almost diagonal motion, but trying to keep the plane facing along the length of the loom, to avoid taking too much material from localised areas. The more care is employed here, the better the final result. Only when one is completely satisfied that the loom is as round as it can possibly be, should one reach for abrasives to finish the job.
Image © Dominik Gschwind
The last piece of shaping is the handle.
Image © Dominik Gschwind
Often the actual design can be down to personal choice, but the diameter is reduced to permit the oar to be handled comfortably.
Image © Dominik Gschwind
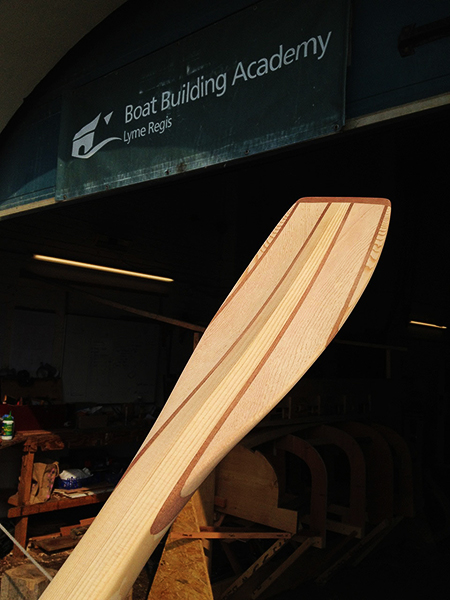
Now one can finish the oar with abrasives to a good smooth finish, removing any final lumps and bumps. One can now apply a suitable finish, we tend to use oil for this as it is easily applied and restored, but it is best not to apply this to the handle as it can make it slippery when wet.
Image © Dominik Gschwind
Image © Dominik Gschwind
Image © Boat Building Academy
Image © Andrew Blundey

Yvonne Green would like to thank Paul Dyer, the Boat Building Academy’s Training Manager and Nick Newland, Chair of the Wooden Boatbuilders’ Trade Association, for contributing their perspective and expertise in order to fully answer some of the questions. I would also like to extend my thanks to Paul and Nick, and especially Yvonne, for taking time out to answer our questions.
To learn more about traditional or modern wooden boat building, or general woodworking, the Boat Building Academy runs a range of taster, ‘short’ and ‘long’ courses throughout the year. For more information, please visit the Boat Building Academy’s website by clicking the link below:


Thursday, July 16th 2020 at 5:11 am
[…] Download Plan More @ http://www.merchantandmakers.com […]
Wednesday, July 15th 2020 at 12:28 pm
[…] Download Plan More @ http://www.merchantandmakers.com […]
Monday, June 22nd 2020 at 5:18 pm
[…] Download Plan More @ http://www.merchantandmakers.com […]
Sunday, June 21st 2020 at 8:49 pm
[…] Download Plan More @ http://www.merchantandmakers.com […]
Friday, June 19th 2020 at 3:48 pm
[…] Download Plan More @ http://www.merchantandmakers.com […]
Tuesday, June 16th 2020 at 6:22 am
[…] Download Plan More @ http://www.merchantandmakers.com […]
Tuesday, June 16th 2020 at 6:22 am
[…] Download Plan More @ http://www.merchantandmakers.com […]
Sunday, June 7th 2020 at 12:48 pm
[…] Download Plan More @ http://www.merchantandmakers.com […]
Friday, January 3rd 2020 at 7:59 pm
[…] Download Plan More @ http://www.merchantandmakers.com […]
Saturday, December 21st 2019 at 1:15 pm
[…] Download Plan More @ http://www.merchantandmakers.com […]
Sunday, October 20th 2019 at 4:28 am
[…] Download Plan More @ http://www.merchantandmakers.com […]
Thursday, September 26th 2019 at 11:02 pm
[…] Download Plan More @ http://www.merchantandmakers.com […]